


How to connect the Internet to a computer
How to connect your computer to the Internet quickly and without unnecessary complications. Understanding the basic principles of connection will be useful for both work and home leisure: from video calls to streaming and cloud services.
How to connect the Internet to a computer: basic methods
There are several basic ways to connect a personal computer to the network. When choosing the Internet in an apartment building, it is important to consider that each option is suitable for certain tasks. A wired connection provides maximum stability and minimal latency. It is chosen for stationary workplaces and tasks with high channel load. A wireless connection (Wi-Fi) provides freedom of movement and ease of setup, it is convenient for laptops and devices that are often moved around the house.
Connecting via network cable
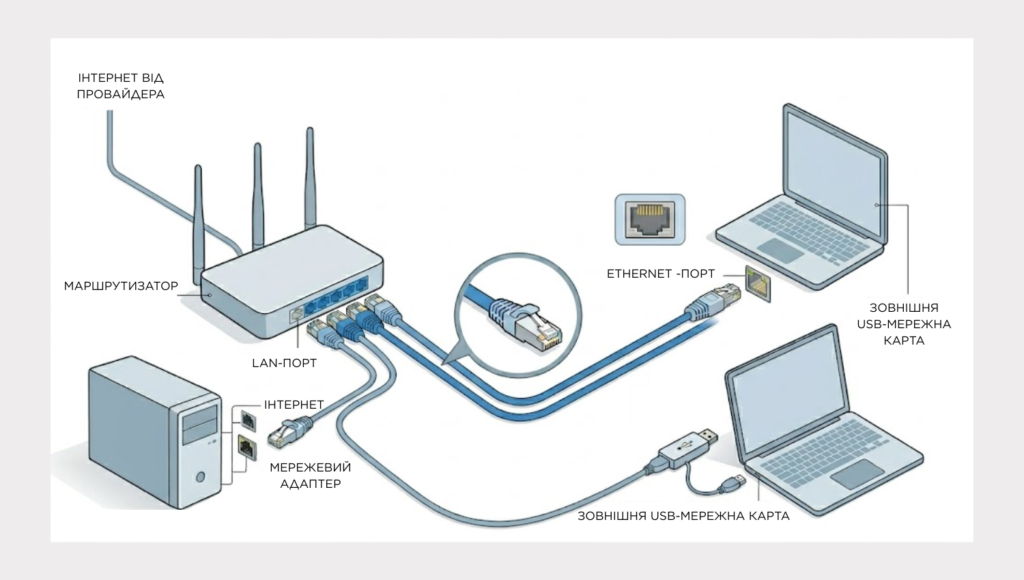
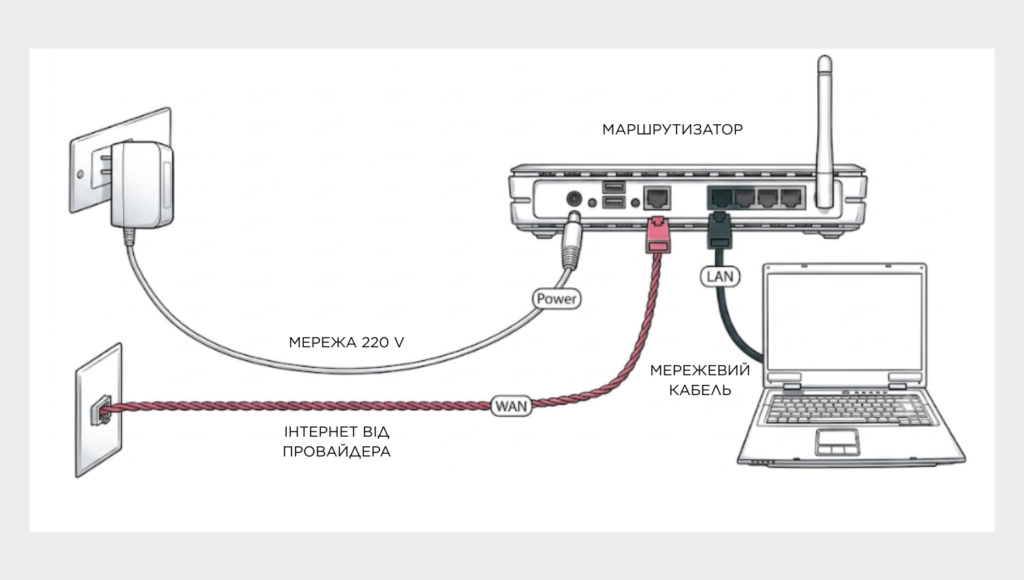
For a wired connection, you will need a network adapter in your computer, a router or modem, and the network cable itself. If this is your first time setting up the equipment and you don’t know how to connect the Internet to your laptop from scratch, start by installing the drivers. In modern systems, the network adapter is often built into the motherboard. If necessary, you can install a separate expansion card. An external USB network card (the so-called “network whistle”) can also come to the rescue. This is a compact device that connects to any free USB port and allows you to organize a full-fledged wired connection. The router or modem receives the Internet signal from the provider’s line and distributes it to the connected devices. The cable provides a physical transmission channel between the computer and the router. The stability and speed of the connection directly depend on this.
Cables differ in category, which directly affects bandwidth and resistance to interference. When choosing, it is important to focus on the network tasks:
- Cat5e – supports up to 1 Gbps (frequency up to 100 MHz). The most popular and affordable choice for home and office networks.
- Cat6 – provides 1 Gbps at distances up to 100 m, and if necessary, allows reaching 10 Gbps over short distances up to 55 m (frequency up to 250 MHz).
- Cat6a – allows data transmission at speeds up to 10 Gbps over a standard 100 m (frequency up to 500 MHz). The optimal choice for modern “growth” systems.
- Cat7 / Cat7a – provide up to 10 Gbps (frequency up to 600–1000 MHz). A feature is the shielding of each pair plus a common shield, which completely eliminates external interference.
- Cat8 is a specialized standard for server rooms and data centers, supporting speeds from 25 to 40 Gbps (frequency up to 2000 MHz).
All of these cables use standard RJ-45 connectors. The installation process is simple: one end of the cable is inserted into the Ethernet port on your computer (or laptop), the other into the LAN port on your router or modem. In most cases, the operating system will automatically detect the connection and assign basic network parameters.
Setting up a wired connection in Windows
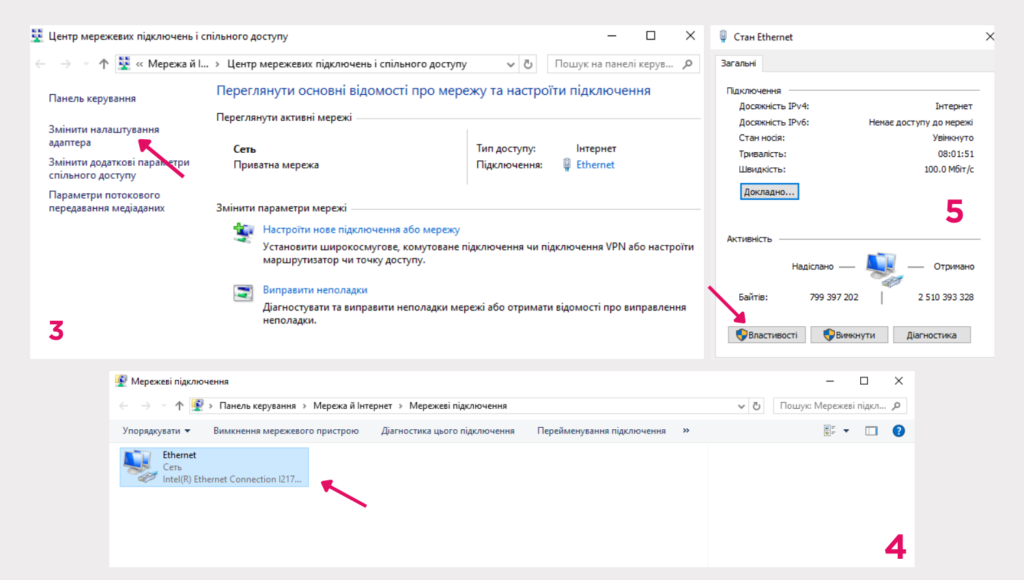
Checking the status of your wired connection starts in Windows System Preferences. Open Control Panel and go to Network and Sharing Center, then select Edit adapter settings. You will see an adapter labeled Ethernet or Local Area Connection in the list—make sure it is enabled via the context menu. If the adapter is disabled, enable it and wait for the status to show “Network.”
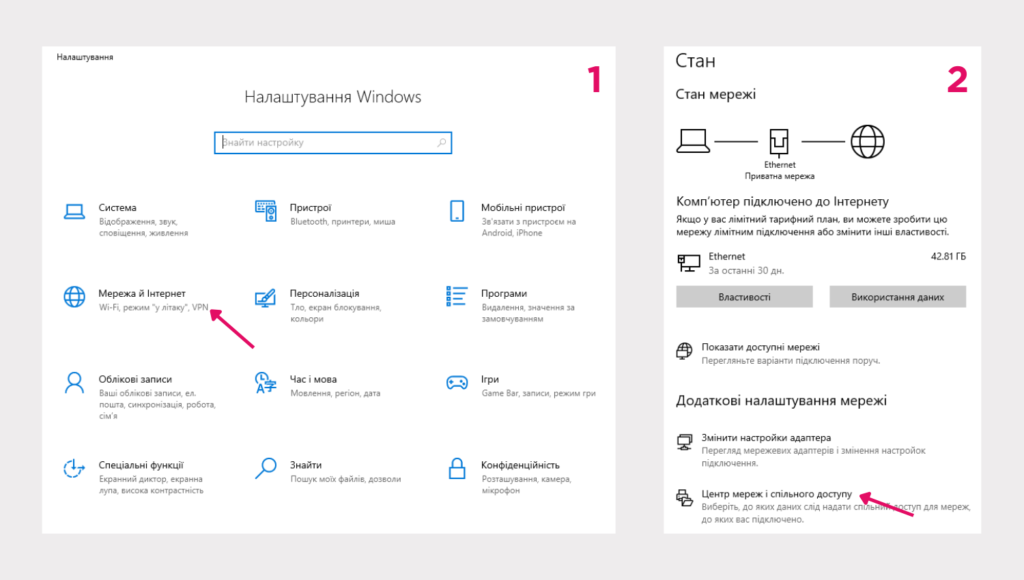
To configure IP settings, right-click on the desired adapter and select “Properties”. In the list, find the item “Internet Protocol Version 4 (TCP/IPv4)” and click the “Properties” button again.
In most cases, the optimal solution is to use automatic settings: if you select “Obtain an IP address automatically” and “Obtain DNS server address automatically”, your computer uses the DHCP protocol. In this mode, the router independently assigns all the necessary addresses, saving you from manual work.
However, if your network configuration requires fixed settings, you can set the static IP, subnet mask, default gateway, and DNS server addresses manually. Be careful with this approach: it is important to follow the network settings exactly as they are set for your equipment. After making changes, save the settings and, if necessary, restart the network adapter for them to take effect.
For quick diagnostics, open a command prompt and use basic utilities — they will show the status of the interfaces and help you identify the problem. The commands allow you to view the current adapter settings, check the availability of external resources, and update the network settings if DHCP does not issue an address. If the results indicate a fatal error or a line problem, contact your provider’s support service for a more in-depth check.
How to connect your computer to the Internet via Wi-Fi
The question of how to turn on the Internet on a laptop via Wi-Fi arises most often among users. A wireless connection requires a Wi-Fi adapter in the computer and a wireless router. The adapter can be built-in or external USB. It is responsible for receiving and transmitting radio signals between the device and the router. The router receives a signal from the provider and forms a local wireless network. This is the most convenient way to organize high-quality Internet in the private sector, providing access to the network throughout the house without the need to lay cables to each device. The connection is made using the network name — SSID — and a password, which guarantees mobility within the coverage area.
Wi-Fi uses different standards and frequency ranges, from classic to the most modern. Depending on the equipment, the network can operate in three main ranges:
- 2.4 GHz is the base band for most older and modern devices. It provides longer range but is more susceptible to interference.
- 5 GHz – used in Wi-Fi 5 and newer standards. Provides faster speeds, but has poorer penetration through walls.
- 6 GHz is the most advanced band (5.925 to 7.125 GHz), available in Wi-Fi 6E and Wi-Fi 7 standards. It is free from interference and provides maximum bandwidth (up to 320 MHz channels in Wi-Fi 7).
Distribution of ranges by standards:
- Wi-Fi 4 (802.11n): 2.4 GHz / 5 GHz;
- Wi-Fi 5 (802.11ac): 5 GHz (and 2.4 GHz on some devices);
- Wi-Fi 6 (802.11ax): 2.4 GHz / 5 GHz;
- Wi-Fi 6E / 7: 2.4 GHz / 5 GHz / 6 GHz.
The connection is standard: select the desired SSID via the system tray and enter the password. To protect the network, modern encryption protocols such as WPA2-PSK or WPA3 are used, which prevent unauthorized access to data. You can clarify the supported standards of the adapter in the documentation for the equipment – this will help when choosing a suitable modern router.
If the network is not visible, check if the adapter is active in the operating system settings and if there are no restrictions on SSID visibility in the router settings. In case of unstable signal, you can change the channel on the router or move the device closer to the signal source – sometimes a simple adjustment of the antenna has a noticeable effect.
Installing and configuring the Wi-Fi adapter
The type of adapter determines the ease of installation and quality of communication: internal PCIe cards usually provide a more stable connection and a better antenna, external USB adapters are easy to install and convenient when transferring between devices. After physically installing the adapter, you need to install drivers so that the operating system can work with it. Windows often picks up drivers automatically, but in the absence of automatic recognition, drivers can be installed from the kit from the disk or downloaded from the official website of the device manufacturer.
If the drivers are installed correctly, the adapter will appear in the list of network devices. Then select the network via the system tray and enter the password. If necessary, additional adapter settings are available in the Network and Sharing Center, including power saving and network type. To improve signal reception, you should check for the presence of an external antenna and, if possible, install the adapter in a port with higher bandwidth, such as USB 3.0 for external devices.
Why the computer does not see the Internet: troubleshooting
If the Internet is not available, start by checking the physical condition of the equipment. Make sure that the cables are not damaged and are securely inserted into the Ethernet ports of the computer and router. Rebooting the router and modem often eliminates temporary failures: turn off the power for 30 seconds and turn it on again. The indicators on the router’s case will tell you whether the provider’s signal and whether the LAN/WLAN ports are active.
Check your network adapter in Device Manager – it should be disabled and show errors. Outdated or corrupted drivers are often the cause of the problem, and you should update them through Device Manager or using the downloaded files. Incorrectly configured network settings, including incorrect IP or DNS, can also prevent network access; check them in the Network and Sharing Center.
A firewall or antivirus may be blocking the connection. Temporarily disabling these programs will help you understand whether the problem is related to them. If local diagnostics did not yield results, there may be a malfunction in the provider’s line or the provider’s equipment. In this case, contact technical support for remote verification and assistance. To ensure stable Internet without electricity, it is advisable to use modern non-volatile connection technologies. For all configuration and diagnostic issues, you can contact SOYUZ Telecom specialists.
How to check your IP address and DNS settings
Checking and adjusting IP and DNS is done through the Network and Sharing Center. Open Change adapter settings, find the adapter — Ethernet or Wi-Fi — and through Properties enter the Internet Protocol Version 4 (TCP/IPv4) settings. The current settings are displayed here: obtaining IP and DNS automatically means working via DHCP. If static addresses are selected, make sure that the entered values correspond to the network configuration and the provider’s recommendations.
To restore network settings and clear the DNS cache, you can use the command line with administrator rights. For deep diagnostics and quick resets, the command line (it is a console) is used. This is a special Windows tool that allows you to manage the system using text commands, bypassing the graphical menu.
How to enter the command line:
- Press the Windows key (the Start icon on your keyboard) or click the search icon on the taskbar.
- Type cmd in the search bar.
- “Command Prompt” will appear in the results. Right-click on it and select “Run as administrator” (this is important because changing network settings requires elevated privileges).
- A black window will open – this is the console.
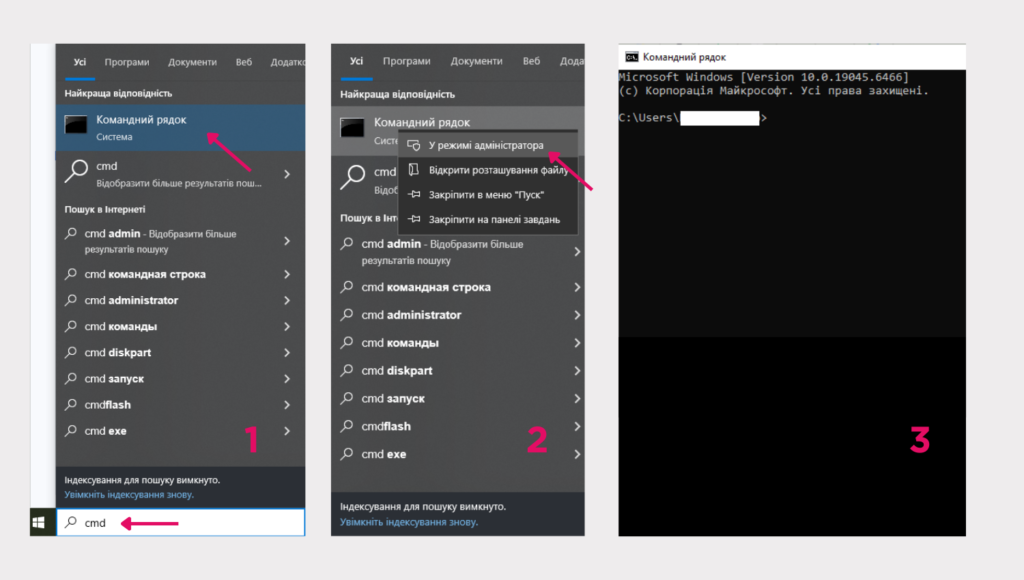
After that, you can enter commands to diagnose and reset the network:
- ipconfig /all;
- ipconfig /release;
- ipconfig /renew;
- ipconfig /flushdns.
The ipconfig /all command displays complete information about network adapters, ipconfig /release releases the current address, ipconfig /renew requests a new IP from DHCP, and ipconfig /flushdns clears the DNS resolver cache – these actions help eliminate many common problems with accessing resources on the network.
Tips for choosing equipment for stable communication
The choice of router and adapters directly affects the quality of the connection. Pay attention to the supported Wi-Fi standards and the presence of two 2.4/5 GHz bands for flexible network configuration. Gigabit Ethernet ports will provide sufficient bandwidth for wired devices. The presence of external antennas or powerful internal modules improves coverage. USB ports provide additional options for connecting drives or printers.
When choosing a Wi-Fi adapter, consider the connection interface: USB 3.0 is better for external adapters due to its higher bandwidth, while internal PCIe modules usually provide better coverage. For most home scenarios, Cat5e is sufficient for 1 Gbps, while Cat6 is useful if you need higher speeds over short distances. In large rooms, an effective solution is a mesh system of several nodes that create a single wireless network and reduce “dead zones”. in the house.
The placement of the router affects the signal quality: place the device in the central part of the room, avoid thick walls and large metal objects. Keep the router away from sources of interference, such as microwave ovens and cordless phones. If you have any doubts about choosing equipment or the optimal configuration, use technical support advice – specialists will help you choose equipment according to your tasks and tariff to organize a stable VIP Internet connection.